We all know that if you are committed to classes (I'd say at least 2-3 a week), you will, without a doubt, see and feel results with Pilates. I think it's important to understand WHY Pilates works so well. Many people are attracted to certain types of exercise because it's the latest fad or it sounds cool. I think anything that gets people up and moving is awesome, but don't you want to know why and how your Pilates sessions work so well? I've thought long and hard about this and these are the reasons why I believe Pilates does the trick.
1. Pilates works your core during every single exercise. Even when you aren't specifically doing abdominal exercises you are holding all those deeper core muscles (transverse abdominis, internal obliques, etc) nice and tight in order to help support and power your extremities. Ever noticed how your abs burn while you are doing seated armwork on the Reformer? (And if they don't, they should!! Close your ribcage, sit up tall, and slightly tuck your pelvis, shortening the distance between the top of your hipbones and the bottom of your ribcage. Now, you'll feel it!) Think about when you have to hold your leg(s) up in space. Assuming you aren't gripping in your quads and hip flexors, how do you think they stay up there? Your core! Everything that you do during a Pilates class is working some part of your core.
2. You are working in spinal alignment, keeping your back safe while strengthening the muscles around it. Many people come to Pilates with lower back pain. In fact, I've noticed that many people in general have lower back pain! Working in proper spinal alignment will allow you to strengthen your supporting muscles in a safe fashion.
3. You work unilaterally, or one side of your body at a time. Single leg and arm work is SO important. Most of us have imbalances, meaning one side of the body is stronger than the other. When you work bilaterally (ie both legs at the same time), your stronger muscles automatically take over and you continue to strengthen your stronger side, while your weaker side falls behind even more creating a bigger disparity. This can lead to all sorts of problems including scoliosis, back pain, knee injury, etc. Training your body unilaterally also helps improve range of motion for the same reasons. Mobility training on one side at a time allows your body to get deeper into stretches. The more even your musculature, the more stronger and more balanced your body will be.
Pilates Caveats:
~Unless you are taking a very fast paced class or are using the jumpboard, Pilates is not aerobic. In other words, you aren't torching calories. This means that you can't justify eating pizza and cake for dinner just because you went to Pilates. It also means that you are not getting your heart rate up, and therefore you need to supplement your Pilates with cardiovascular activity for heart health.
~Be wary of using DVDs unless you really know what you are doing. I know Pilates classes can add up and a 20 dollar DVD you can use over and over again is very tempting. A DVD does not replace a certified instructor who can watch your alignment and make sure you are not doing anything to hurt yourself. In fact, Joseph Pilates meant for matwork to be done as a supplement to equipment and to really only use once you were strong enough to support your own body weight in space. There are a ton of things you could be doing wrong, and the more times you do something incorrectly, the more it becomes ingrained in your muscle memory and hard to undo and retrain.
Thursday, September 29, 2011
Sunday, September 25, 2011
My First Paleo Dinner!

On Saturday I am embarking on a month long challenge with my CrossFit gym where we eat a strictly Paleo diet for the whole month of October. I was kind of on the fence about this because I'm not the type of person who likes to cut out food groups entirely. It just freaks me out. But I've been hearing so many great things about Paleo (and since I'm lactose intolerant I've already completely given up dairy) so I figured I can do it for 31 days. I intend on adding corn, legumes, soy, and maybe some whole grains back into my diet as soon as the challenge is over, but I am interested to see what happens by staying strict the whole month. We had a seminar this evening where the purpose of why grains, soy, dairy, etc. is cut out of the diet was explained to us in detail and all of our questions were answered. I was feeling a little nervous about it when I got home so I decided to cook my first Paleo meal to give myself a little reassurance that I can do this. The result was awesome. Baked tilapia with a veggie sauce over spaghetti squash instead of my usual whole wheat pasta or grains. It was filling and fabulous. I am totally committed to this challenge and feeling good about it!
~Dice yellow squash, yellow pepper, zucchini, onion, garlic, and two sundried tomatoes halves and saute in olive oil.
~Brush tilapia with olive oil, lemon juice, lemon pepper, pinch of garlic salt and bake at 350 for 25 mins in toaster oven.
~Prepare half a spaghetti squash (I did it in the micro--it took 4 mins--how awesome?!)
~When veggies are cooked to your liking, remove them from heat and put contents in a bowl and mix a tablespoon or two of eggplant meze in.
~Place tilapia over spaghetti squash and top with veggie sauce. VOILA!
Healthy Crock Pot Chili
There's nothing like some delicious chili on a brisk autumn evening! I'm usually not one to brag, but my chili kicks ass. And it's healthy! Use lean ground beef, bison, or buffalo as your meat then follow the recipe! I prefer a mix of beans--pinto, kidney, black.
1 lb. ground browned beef (I use Laura's 92% lean)
1 can organic beans
1/2 can of pureed organic beans
1 can organic tomato sauce (15 oz)
1 can organic diced tomato
2 tbsp. chili powder
1.5 tbsp. fresh ground coriander
1.5 tbsp. cumin
1 tsp. turmeric
1 tsp. oregano
.5-1 tsp cayenne pepper (depending on hotness preference)
1 tbsp. minced vidalia onion
1 tsp. garlic salt
1 tsp. onion powder
pinch of fresh ground black pepper
1) Mix seasoning and set aside
2) Brown the beef in a touch of olive oil and drain
3) Add onion and half of the seasoning mix
4) Add tomatoes, sauce, whole can of beans, rest of seasoning into Crock Pot
5) Add pureed beans and meat to Crock Pot
6) Stir, cook on simmer for 6-8 hours.
**Helpful Hints**
~Always rinse your beans first. This will aid in your digestion of the beans.
~Throw some red pepper flakes in it if you want to spice it up! Or just add more cayenne pepper, but be careful! A little bit goes a long way.
~Stir occasionally--it helps keep the sides from sticking.
~Originally the turmeric wasn't in my recipe, but I accidentally put it in last time and it was good! So if you don't have that, don't worry about it.
Inov-8 Review

Indeed, I love my Nike Free Runs, but I was very intrigued by the Inov-8 cross training shoe that nearly everyone at my CrossFit gym wears, so I bought a pair at Tradehome in the mall. (Hoosier CrossFit members get 10% off!) So here's the deal on these shoes: No wonder everyone wears them. They're amazingly light and supportive. I think they are more stable than my Nikes due to the sole. The sole on the Free Runs flares out a little bit and if you roll over slightly it kind of buckles. The Inov-8's soles are flush to the ground, so they are very stable. They are just as light, if not lighter than the Free Runs, which I love. All in all they are a fantastic cross training shoe, but I have two complaints. First, they only come in whole sizes. Big time fail for people who are in between. The size 8s were way too snug so I bought the 9s which are definitely too big. Secondly, for people with really skinny feet (not width wise but top to bottom), there is definitely a little too much room. The Nike Free Runs have a bit lower of a profile which fits my foot a little better. I think if these shoes were available in my real size, an 8.5, this wouldn't really be an issue. Like I said, these are great shoes--worth every penny--and I will be wearing them to CrossFit and saving my Nikes for running and walking. They come in a variety of nifty colors too!
Friday, September 23, 2011
Can We Get Rid of Cellulite?
Unfortunately nothing can completely eliminate cellulite :( But don't get discouraged! There are ways you can dramatically reduce the appearance of cellulite WITHOUT surgery or any bullshit cream. I'll get right to the point. A few things: Strength training, High Intensity Interval Training (aka HIIT), water, 7-8 hours of sleep a night. Many women think that very lengthy cardio workouts at a lower intensity is the way to blast cellulite and this is incorrect. All those treadmills and elliptical machines at the gym highlight the "fat burning zone" which is a low intensity zone. This is a waste of your time and energy. What you need to be doing is HIIT. A 15 minute HIIT workout is much more effective than plugging away on the elliptical for 40 minutes. (Not to mention, for all you people out there that rely on how many calories the elliptical machine says you burned, it's pretty inaccurate even if you enter your weight stats).
Why strength training? Increasing your lean muscle mass will give you a more toned look and a smoother overall appearance. Why HIIT? You will burn more calories in a shorter amount of time. Additionally, mixing up your HIIT so that you are doing something different all the time will keep the muscles confused, therefore they won't adapt to any one particular workout, which makes it less effective. Staying well hydrated and well rested will also help keep your body at peak performance levels.
So if you have some lingering cellulite you want to get rid of, find certified trainer to help get you started with some HIIT, join a CrossFit gym, or google some sample workouts if you are highly self motivated. Bye bye, cellulite!!
Wednesday, September 21, 2011
Protein Pumpkin Pancakes
Autumn is finally here which means I like everything PUMPKIN flavored! Here is a recipe for high protein pumpkin pancakes!


Pumpkin Pancakes
4 egg whites
1/2 c. oatmeal
1/4 c. cottage cheese (I like 1%)
3-4 packets no calorie sweetener (I use Splenda)
1/2 c. canned plain pumpkin
1 tsp cinnamon
1/2 tsp nutmeg
Tuesday, September 20, 2011
Handstands

One of the most fun, yet most frustrating poses in yoga is the handstand. I used to watch other more advanced yogis do handstands with such ease and no fear. Every time I attempted one I wouldn't even make it halfway up because I was scared. This past weekend I got the opportunity to spend 6.5 hours with Brock and Krista Cahill at my wonderful yoga studio, Vibe Yoga. This husband and wife duo are gravity defying and just plain awesome. In the beginning of the first workshop I started out next to the wall because there was just no way I was going to be attempting handstands without a wall. Krista led us through some serious ab work and Brock taught us how to begin practicing handstands in a way in which we wouldn't flop all the way over and hurt ourselves. Immediately I felt better. Since my back is so flexible I always worry about arching in my back mid air and collapsing. Krista taught us how to practice going up into handstand--beginning in three limb dog with your hips totally parallel. From there starting to launch up, but keeping the standing back leg straight as you push up. You should get up into handstand first without ever bending that back leg, so that way you always have that back leg to come back down on. That was such a "duh" moment for me. If you never bend that back leg to try to bring it up to meet the top leg, you will never arch over. Now once you get up into a balance you can raise that back leg up, making sure you knit your ribs together and slightly tuck the pelvis. By shortening the distance between the tops of your hips and bottom of your ribs, you will be engaging the core and stacking up straight in handstand. Push the shoulders down away from the ears and feel like you are squeezing your arms in, almost feeling as though you are wrinkling the mat between your hands. What's holding you up in your handstand is your belly, not your arms :) Have fun handstanding...and if you ever get the chance to take class with Brock and Krista, do it! They're amazing! They travel a lot but their home studio is Yogis Anonymous in Santa Monica, CA. They even live stream their classes on their website! <3
Monday, September 19, 2011
Ain't No School Like The Old School
There's always some new, innovative, fancy type of exercise that makes promises of immediate, fast, amazing results...blah, blah, blah. Sometimes you just have to stick with what works! High energy calisthenics are awesome because they require about 6 feet of space, no equipment, no memberships, nothing. These exercises can be done in 15 minutes in a hotel room. They are perfect for travelers. This post pays homage to all those old school moves that worked before science, pills, and enhancement drugs!
1. Burpee
First, start in a standing position, then drop intoa squat position with your hands on the ground. Kick your feet back while lowering yourself all the way to the ground like a pushup. Then, return your feet to the squat position while straightening your arms and jump up as high as you can from the squat position with your arms overhead, clapping your hands overhead when you reach your peak.
2. Mountain Climbers
Begin in a plank position. Pull one knee into your chest keeping your hips as low as possible and alternate pulling each knee in as quickly as possible. Try to keep the knee as close to your midline as possible each time you pull it in. This is great for raising your heart rate and challenging your core!
3. Squats
Good old fashioned squats will work those big muscle groups in the legs. Begin with your heels under your hips and toes fanned out slightly. Rock your weight back into your heels and maintain weight in the heels throughout the entire exercise. You can even lift your toes up in flexion to ensure your weight stays in your heels. Lift your arms overhead, slightly in front of you with fingers interlaced and palms facing forward (knuckles facing you). Begin lowering your body down (while sticking your butt out in order to maintain a long, flat spine), until your thighs are parallel to the floor, or as low as your hamstrings will allow. Keep your hands reaching up and out, and this will force your chest to stay in the correct position.
4. Jumping Jacks
Get that heart rate up quickly with this gym class favorite! We all know how to do jumping jacks, but play with them. Double up with the legs staying out, jump as high as you can, change up the speed. You get the idea.
5. Tricep Dips
Ok, so I lied. You need a chair for this one. Make sure it's a steady chair that can support your body weight! Start by sitting with your legs extended in front of you, a few inches away from the seat of the chair on the floor. Bring your hands (about shoulder width apart) to the edge of the seat fingers facing toward your body. Push yourself up by pressing the heel of your palms into the chair and keep your body perfectly straight by holding the belly in tight. Try to keep your shoulders pressing down in order to keep the work in the triceps.
6. Push Ups
See previous post which is all about the push up! Yay push ups!
7. Sit Ups
There are so many variations on the sit up. Today we will tackle the sit up in it's most basic, original form. Laying supine on the floor bring your feet flat on the floor so your legs make a triangle shape, knees pointing toward ceiling, feet hip width apart. Arms crossed over your chest. Inhale and the bottom and on your exhale, engage your belly muscles as you curl forward and up (all the way up, my friends--this is not a weeny crunch). This old fashioned sit up is an awesome hip flexor strengthener. If you can't quite get yourself up yet, you can put weights on your feet, or ask a friend to hold your feet down.
8. L Sits
L sits are an advanced core and hip flexor strengthening move. This is a toughie, especially if you are tall or have long legs! Begin sitting up nice and tall with your legs extended in front of you with your hands flat on the floor right underneath your shoulders. Push your shoulders down and keep them down the whole time as you engage your core and left those legs off the floor! Push those hands hard into the floor and really tighten up that belly and watch yourself levitate! If you try this and are like "Um, what? My legs aren't moving.", then start with lifting one leg at a time until you have enough hip flexor and abdominal strength to get both legs up off the floor. Remember to keep pushing your shoulders down your back and keep your neck long. You can do it!
Friday, September 16, 2011
5 Minute Workout
I always hear the excuse, "I don't have time to workout". First of all, I'd like to address that statement with a great quote I heard from one of my CrossFit Trainers..."If it's important, you'll find a way. If it's not, you'll find an excuse." So quit making excuses and get that tush moving! That being said, sometimes we really are crunched for time, but I can guarantee absolutely everyone has 5 minutes. If you could only do one more exercise for the rest of your life (or in this case, you really only have 5 minutes) it would be.......drumroll please........push ups!! Oh yes, everybody's favorite. But the push up is awesome because it works literally every muscle in your body if done correctly. The beauty of the push up is that there are modifications for everyone. Even my mom who has double knee replacements and arthritis in both knees and wrists AND carpal tunnel syndrome can do modified push ups. A few things about push ups.
1. Keep your body in a line--that means your butt is not sticking up in the air. Your spine should be in one long straight line.
2. Your kneecaps should be pulled up, actively engaging your quadriceps.
3. Hands slightly wider than shoulder width apart, fingers spread wide.
4. Shoulders pressing down the back, neck nice and long--in line with your spine, so your gaze is down at the floor.
5. Lower your body onto the floor completely (chest needs to make contact with the floor or it doesn't count!)
6. As you press pack up, lift your hips up simultaneously with your arms so you don't get the "worm" effect.
7. Keep your core tight the whole time--engage those abs to help propel your body back up!
*If you need a modified position because you lack the upper body strength in a standard position, drop to your knees. But remember, if you are on your knees you still need to keep your butt in line and not let it stick up in the air.
*If you want to work your triceps more you can take chaturanga push ups which means stacking the hands directly underneath shoulders, and elbows grazing the rib cage, pointing backward as your lower down.
*If you want to raise your heart rate a bit do some burpees!
YAY for push ups!! ;)
Tuesday, September 13, 2011
My Cereal Has What In It??
The other day when I was grocery shopping I realized something really unfortunate. Special K cereal had high fructose corn syrup in it!! I avoid hfcs like the plague, but I never even thought to check something like SPECIAL K! I was so annoyed. I continued down the cereal aisle and found that MOST CEREAL has hfcs in it. None of the cereal in the organic aisle had hfcs listed in the ingredients, but my issue with most organic cereal is that it's usually not fortified with vitamins and minerals and I really like getting a good dose of iron, magnesium, etc. in my breakfast cereal. The following is a list of fortified cereal that did not contain hfcs:
Cheerios
Grape Nuts
Quaker Oat Squares
Kashi (most, not all)
Shredded Wheat
Life (cinnamon and regular)
Crispix
Wheaties
Fiber One
Rice + Wheat Chex
Total
Surprisingly a lot of the sugary cereals like Lucky Charms, Count Chocula, etc. all contain real sugar and not hfcs, but they contain so much sugar that they are not the best choice to get your morning started right. So check those labels because what you find might shock you!!
Protecting Your Lower Back During Abdominal Work
Are you having pain during abdominal work in your Pilates mat classes? Do you feel a crunching sensation in your lumbar curve, especially during lower belly work? Well you are in luck because I have a quick easy solution for you!
While laying supine on the mat simply make a triangle shape with your hands by touching thumb to thumb and forefinger to forefinger. Now slip your triangle underneath your tailbone, high enough that it's supporting the lower part of the spine, but low enough that your finger tips stick out like little tail feathers. Et Voila! This will force your spine into alignment as you do your abdominal work. Always remember to keep pulling the belly button into the spine, and keep your pelvic floor engaged. These adjustments will definitely help keep the pressure off your lower back so you can strengthen your core with abandon!
While laying supine on the mat simply make a triangle shape with your hands by touching thumb to thumb and forefinger to forefinger. Now slip your triangle underneath your tailbone, high enough that it's supporting the lower part of the spine, but low enough that your finger tips stick out like little tail feathers. Et Voila! This will force your spine into alignment as you do your abdominal work. Always remember to keep pulling the belly button into the spine, and keep your pelvic floor engaged. These adjustments will definitely help keep the pressure off your lower back so you can strengthen your core with abandon!
Saturday, September 10, 2011
Another Playlist!
It's only 8:15 am and I'm already dragging ass. Since I have some time to kill before my 9:30 class this morning, I figured I would make an upbeat playlist for class to get everyone (myself included) nice and energized!!
Hello - Martin Solveig
Sweet Home Alabama - Lynyrd Skynyrd
Scheibe - Lady Gaga
Ghosts N Stuff - Deadmau5
Another Night - Real McCoy
Bad Romance - Lady Gaga
Call On Me (Radio Edit) - Eric Prydz
What A Feelin' - Irene Cara
Til The World Ends - Britney Spears
Escapade - Janet Jackson
Mo Money, Mo Problems - Mase, Puff Daddy
Snow (Hey Oh) - Red Hot Chili Peppers
Jessie's Girl - Rick Springfield
Crazy - Britney Spears
Push It - Salt N Pepa
I Wanna Dance With Somebody - Whitney Houston
Proud Mary - Tina Turner
Yes, this mix should wake anybody up ;) Have a great day y'all!
Thursday, September 8, 2011
The Best Workout Stuff Ever, Part 2


A plain old lacrosse ball is not comfortable, but boy does it relieve muscle knots. Use it anywhere and put your full body weight into it! Taping together a pair of lacrosse balls makes a great makeshift masseuse for your spine.

Lululemon Power Y Tank. This looks like any ordinary tank top, but the fabric quality is superior. It also has a build in bra with removable padding. This tank stays in place no matter what position you are in or how sweaty you get. It's so comfortable and supportive that I wear it as a layer tank with my street clothes.

Victoria's Secret Yoga Pants. I know I mostly rave about Lululemon products, but these are a really great cheaper yoga pant. I have a freakishly long inseam and these pants come in 36" length! Whenever VS has their semi-annual clearance, I snag a bunch of these pants. They come in a variety of colors and lengths and are very comfy.


The Lululemon Scuba Pillow Hoodie. This hoodie, albeit expensive, is so warm its almost like a jacket and the best part is, it zips into itself and converts into a travel pillow. Ah-ma-zing. I recently took a trip to visit my parents and wore this on the plane and words can't describe its perfectness.

Nike Free Runs. So light, so comfortable, so flexible. These shoes are supportive enough for all the fun stuff I do at crossfit (think box jumps, rope climbs, weight lifting...) but are light enough that my feet don't feel like they are dragging when I run. I've been meaning to buy a pair of Inov-8s, a crossfit favorite. Apparently they are similar to these Nikes, so I will definitely be buying a pair soon and reviewing them on my blog.
Wednesday, September 7, 2011
New Playlist
Good morning! Time for a new playlist! Here is a relaxing one with a bunch of good throwbacks for you on this chilly September day. Enjoy <3
Walking In Memphis - Marc Cohn
Breathe Me (Mylo Remix) - Sia
By Your Side - Sade
Can't Help Falling In Love - Elvis Presley
Carribean Blue - Enya
She's Like The Wind - Patrick Swayze
Over and Over - Nelly + Tim Mcgraw
Save Tonight - Eagle-Eye Cherry
Hallelujah - Jeff Buckley
The World Spins Madly On - The Weepies
Here Comes The Sun - Richie Havens
Monday, September 5, 2011
Saffron Quinoa

Clearly I have been on a quinoa kick lately. This time I found a recipe for saffron quinoa with dried fruit and toasted almonds in the September issue of Yoga Journal, and I added grilled chicken to it for extra protein. Here's the recipe...it makes 4 servings.
1-2 grilled chicken breasts, depending on how much you want
1/2 c fresh orange juice
1/8 tsp turmeric
pinch of saffron threads, crushed
1 c water
1 c quinoa (dry)
1/3 c slivered almonds, toasted
1/3 c thinly sliced dried apricots
1/3 c currants or golden raisins
1 tbsp olive oil
1 tbsp lemon juice
Minced zest from 1 orange
salt + pepper
1. In a medium saucepan, bring juice, turmeric, saffron, and water to a boil. Add quinoa, cover, reduce heat and simmer until liquid is absorbed.
2. Stir in diced grilled chicken, almonds, apricots, currants, oil, lemon juice, and orange zest. Season to taste with salt and pepper.
**Helpful Hints**
~Make sure you remove all the white part from the zest, otherwise it will be a bitter orange taste.
~Don't over toast almonds or the flavor will overpower everything else in the dish.
Engaging the PC Muscles
This post is a little, well, awkward. We're talking about the pubococcygeus muscles, also known as your pelvic floor muscles, or in yoga terms, the Mula Bandha. As I taught a Pilates mat class the other day I noticed how a few of my clients were really loose in their pelvis, letting it rock around sort of wildly, thus making their abdominal work much harder for themselves. As soon as I gave my speech about engaging the pelvic floor muscles, one woman exclaimed "Oh my gosh, this helps so much!" I think often times, especially during strenuous abdominal work, we forget to keep the pelvic floor muscles engaged and lifted, which actually makes the work a lot harder. Engaging the PC muscles stabilizes the pelvis, supports the organs of the lower abdomen, and help us to focus on developing core strength.
Childbirth, inactivity, and aging are just a few examples of what can lead to weak or even damaged PC muscles. When our pelvic floor muscles become weakened, all kinds of negative outcomes can occur--incontinence, decreased sexual satisfaction, a prolapsed uterus, and even structural imbalances in the musculature can occur, leading to abdominal or lower back pain.
So how do we engage these muscles? It's easy! Suppose you had to stop yourself from peeing. (I know, that sounds weird--just stay with me for a minute...) That muscle you pull up is your pelvic floor. So keeping that engaged and pulled up, tight into your abdomen during Pilates, yoga, or any other type of exercise will help protect and stabilize your pelvis. It will also keep that muscle strong, preventing some of the issues we discussed earlier. Kegel exercises are great too--engaging that muscle for a few seconds, releasing and repeating. People often overlook the importance of your pelvic floor, but when it's properly engaged it really does help engage those deeper abdominal muscles like the transverse abdominis.
Sunday, September 4, 2011
Mango Black Bean Salsa
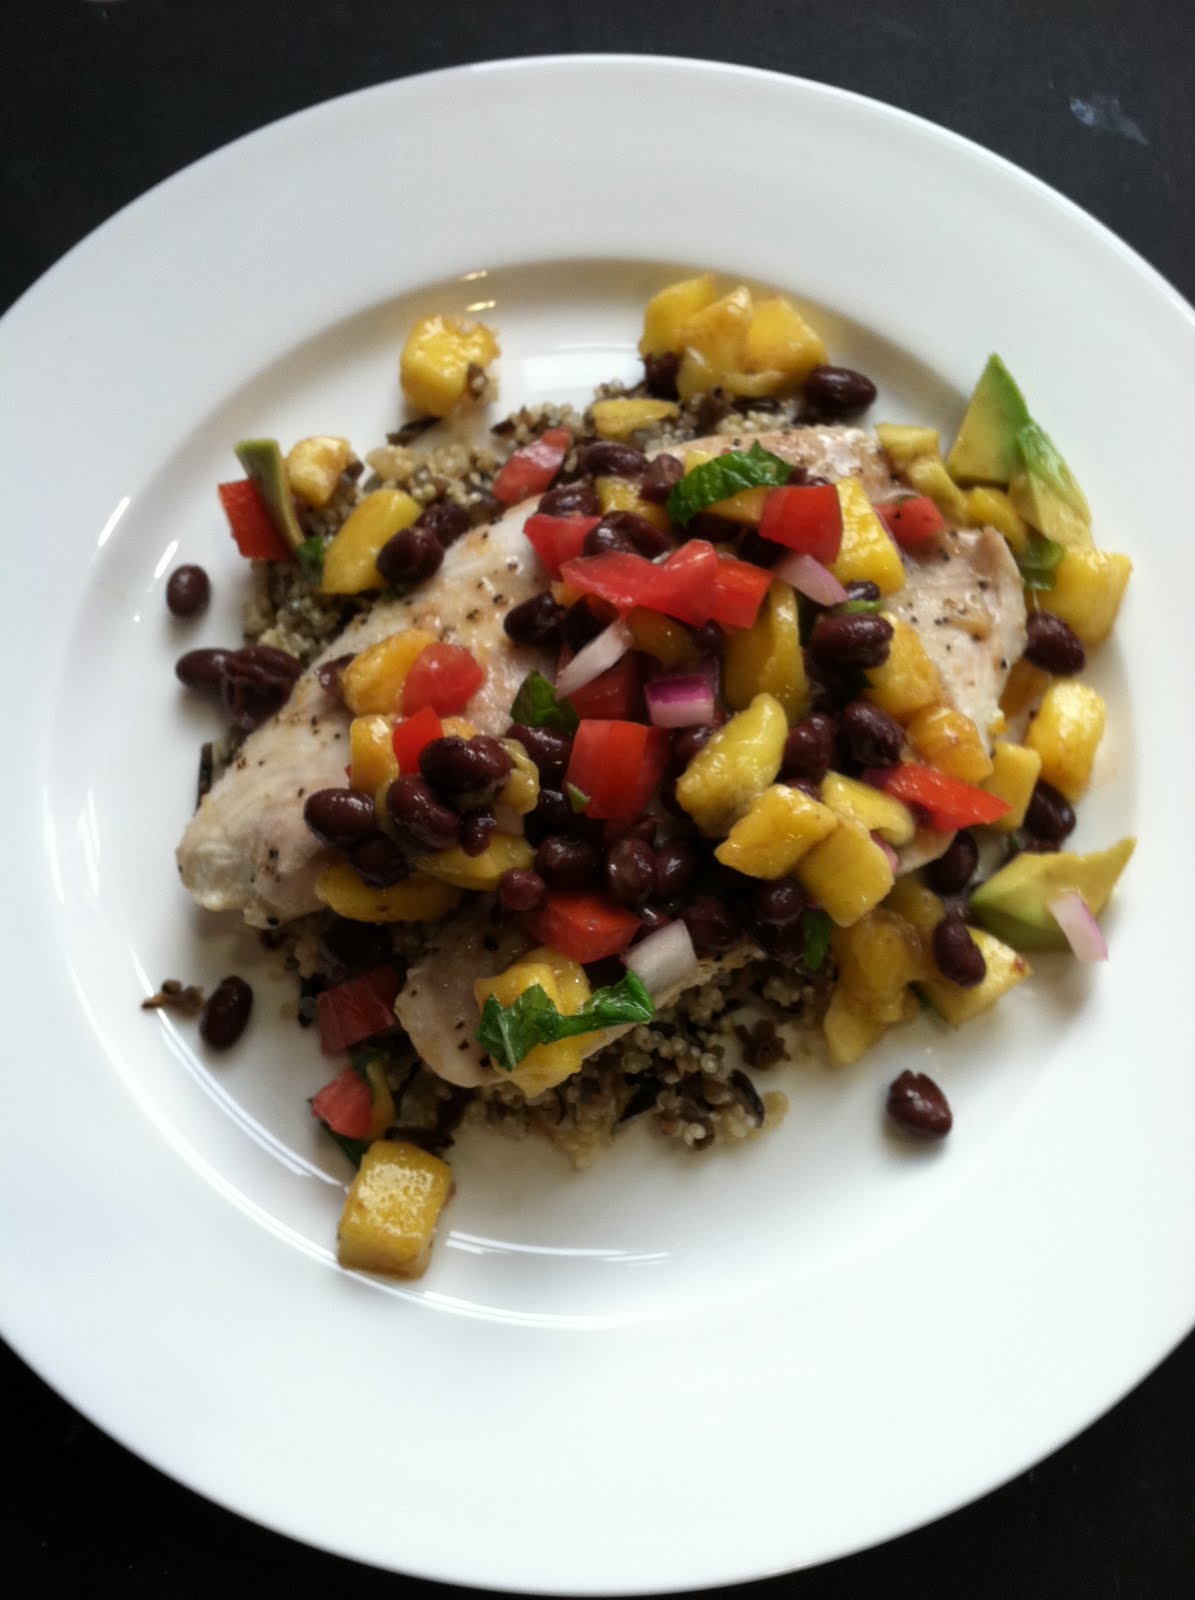

Slowly but surely my cooking skills are improving! Instead of getting frustrated by trying to follow recipes exactly, I have decided to boldly go out on my own and completely invent recipes that seem like they'd be good. So far, success! This particular mango black bean salso recipe I have to give props to my friend KP. I tweaked it a little bit (mostly because I forgot about some of the ingredients), and it is delicious!
Recipe for Baked Tilapia with Homemade Mango Black Bean Salsa over Quinoa and Wild Rice:
1. Brush tilapia with olive oil and lemon juice. Sprinkle garlic salt and lemon pepper, wrap in parchment paper+foil and pop in toaster oven at 375 for 25 minutes.
2. Prepare 1/8 c. (dry) quinoa and 1/4 c. (dry) wild rice in separate saucepans.
3. Chop 1/2 a mango, 1/4 avocado, 1/8 red onion, 1/2 tomato (remove the seeds), a few fresh mint leaves, and combine with about 1/3 c. black beans, kosher salt, and 1 tbsp. agave nectar
4. Mix quinoa and wild rice, place fish on top, then top it off with your salsa! (I only needed about half of the salsa mix) Enjoy!!
**Helpful Hints**
The ingredients I left out include cucumber, white wine vinegar, and hot sauce. I also subbed agave nectar for sugar. I'll definitely be trying it with those added ingredients next time! The wild rice I used was not a mix with white rice since I try to avoid that. It was all wild rice...I had never seen it before but I found it at the grocery store yesterday. The brand I used was Gourmet House 100% Natural Minnesota Quick Cooking Wild Rice. It took 5 minutes and was delish. Since the quinoa takes about twice as long, start that first.
Friday, September 2, 2011
Blast Away Your Muffin Top
Ok, ladies (and gents). Today we are talking about problem areas. Everyone has that one (or more!) areas that they would like to change on their body. At the risk of sounding like a debbie downer, it is really hard to spot reduce...in fact, nearly impossible. In order to lose weight in one area of your body, you basically have to reduce weight all over. For instance, doing a million billion crunches isn't going to help flatten your tummy if you aren't reducing your overall calories. In order to lose one pound of fat you need to have a calorie deficit of 3,500 calories. This is best achieved by a combination of diet and exercise. If you divide 3,500 by 7 (for each day of the week), that equals 500. So if you aim to have a calorie deficit of about 500 calories a day, you will lose 1 pound a week. Easy peasy, right? Well, it's a little more complicated than that. If you hate exercise and just decide to go on a crash diet, reducing those calories you will lose weight; however, the weight you will be losing is mostly muscle and water and your body will prepare for starvation mode by sending out the stress hormone cortisol (which is partly responsible for visceral, aka belly fat) and will cling to every calorie for dear life. This is NOT what you want to do. If you tweak your diet to eating healthy, whole foods and add a mix of cardiovascular and strength training to your weekly regimen, you will see much better, faster results. Whatever you do, make sure you are eating ENOUGH. Consulting a registered dietitian is your best option, but in general women need at the very least 1200 calories for their systems to function properly. Don't believe me? Here is where all the calories go:
Heart: 12% of calories or about 168 calories a day.
Kidneys: 12% of calories or about 168 calories a day.
Liver: 23% of calories or about 322 calories a day.
Brain: 23% of calories or about 322 calories a day.
Skeletal Muscle: 30% of calories or about 420 calories a day.
This doesn't mean just eating 1200 calories...this means after you have calculated how much you are burning in your workout you need to add that to 1200. So, if you are burning 3-400 calories in your workout, make sure you are eating at least 15-1600 calories a day. If counting calories drives you insane use a hunger scale. Your body is really good at telling you what it needs. Below is an example of a hunger chart that can be really helpful:

That being said, there are steps you can take to tone areas that are a little jigglier than others.
Problem Area #1: THE MUFFIN TOP
Muffin top, spare tire...whatever you call it, it's no fun. First let's discuss the muscles involved in the area that we need to work on toning. In the front we have the rectus abdominis, or the 6-pack. Underneath that we have the transverse abdominis which wraps around like a corset. On the sides we have internal and external obliques, and in the back we have the erector spinae. I'll give you a few examples of exercises you can do to tackle each of these areas.
*The Pilates 5 Series-->this is a 5 part exercise series that attacks the rectus abdominis, transverse abdominis, and the internal obliques.
1. SINGLE LEG STRETCH
This exercise develops abdominal strength in isometric contraction, and develops stability of the pelvic-lumbar region. Begin by lying supine on the mat, inhale roll up in a C-curve (looking at the belly button), pull the knees into a reverse table-top position. Exhale, extend the right leg out in front, hovering about a foot above the floor, while placing both hands gently on the left knee holding it in a reverse table top position and begin to switch the place of the legs. Continue switching legs, about 8-10 times.
2. DOUBLE LEG STRETCH
Normal 0 false false false EN-US X-NONE X-NONE This exercise develops abdominal strength while emphasizing trunk stabilization. Begin in the same position as single leg stretch. On the inhale move arms overhead while simultaneously straightening legs out shooting them out in the opposite direction, exhale and sweep the arms around returning to the starting positions. Repeat 8-10 times.
This exercise strengthens the oblique abdominal muscles, as well as developing pelvic stabilization and trunk rotation. Begin by lying supine on the mat, rolled up in a C curve, gaze at the belly button, legs in reverse table top. On an exhale extend the right leg out straight, hovering about a foot above the mat, left leg stays in table top and reach the right elbow toward the left knee by rotating at the waist. Inhale and change the legs while simultaneously rotating the torso in the opposite direction. Repeat 8-10 times.
*Side Lying Leg Series Normal 0 false false false EN-US X-NONE X-NONE -->This series is another Pilates staple and are done lying on one side, back parallel to the edge of the mat, and feet piked forward about 45 degrees. This series focus on hamstrings, back extensors, abductors and adductors as well as oblique abdominals and serve to strengthen the lateral flexors, stabilize the pelvic-lumbar region, as well as develop hip adductor control and hip disassociation. There are many different types of side series choreography but I will focus on “side leg lift” and “side kick” for beginners.
Stay tuned for more problem area solutions. Videos to come!
3. LIFT/LOWER LEGS
This exercise develops abdominal strength, particularly in the lower abdominals. It also serves to strengthen hip flexors. In the beginner version of this exercise I like to begin by lying supine on the mat, making a diamond shape with the thumbs and forefingers and slipping the hands underneath the tailbone in order to ensure that the low back doesn’t arch. Keeping the head down on the mat, on an inhale lower the legs as far as possible and on the exhale raise the legs back up. Repeat 8-10 times.
4. HAMSTRING PULL
Normal 0 false false false EN-US X-NONE X-NONE This exercise strengthens the abdominal muscles, develops pelvic-lumbar stabilization, as well as increases hamstring and hip-flexor flexibility. Begin by lying supine on the mat, rolled up in a C-curve, gazing at the belly button. Both legs are pointed up to the ceiling, place the hands behind the calf of one leg and lower the other leg, hovering it about a foot above the mat. On an exhale draw the extended leg closer to the body, pulse it once or twice, and switch legs. Repeat 8-10 times.
5. CRISS CROSS
5. CRISS CROSS
*Side Lying Leg Series
In the side leg lift we begin in the position described above, let the top leg float up while keeping the hips stacked, and then resist the leg coming back down, very slowly and deliberately. In the side kick, we begin in the above described position as well, but this time raise the top leg a few inches off the bottom leg, extend it forward and back carefully not letting the trunk tip forward or back with the leg.
Stay tuned for more problem area solutions. Videos to come!
Subscribe to:
Posts (Atom)